Apart from the wicked beards and the gun racks on their bicycles, Amish are known for a 3rd thing: building really good furniture. So, if they can do it, why can't I?
First stop: Palo Alto Hardware store. I didn't really expect them to have a wide selection of wood, but I figured they'd point me in the right direction. Next stop was Bauer Lumber down Camino Real; however, they only had planks of wood, and I need 2x2s for the legs. The guys there did help me decide what wood I should use, though. I had originally decided on cherry, but they convinced me it would be too expensive. Most hard wood is expensive, actually. Third stop: Minton's in Mountain View. Oh man, this was everything I wanted in a hardware/lumber store! I ended up with some 1x8 and 1x3 planks, some 2x3s for the frame, and 2x2s for legs.
The planks for the table top were already finished, but Minton's was able to saw off a quarter inch to get a nice clean edge. The first step was to wood glue and clamp two planks together and repeat until I had 3 planks composed of two boards. I glued two of these together, but I ran into a problem putting the third on: the clamp wasn't big enough. The hardware store didn't have pipe clamps, either. Hmm... I ended up being able to use both clamps connected together, and just clamping the middle. Easy!
For the frame, I connected the 2x3s and in a square pattern and screwed the 2x2s into the corners of them. 2 screws on 1 face and 1 screw on the other face seemed to be enough to make it stable. Easy!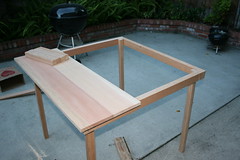
After the table top dried, I realized it wasn't too stable. I also had the problem of how to attach the table top to the frame. I had some 1x2s lying around from a failed attempt to make bed slats, so I decided to put them to good use. Going across all of the planks, I used wood screws to attach the 1x2s to each board, using a screw that fell just short of piercing the table top. I also placed them in such a way and cut them to the proper length so that they also act to secure the table top to the table. I don't know the right words to explain this, so check the picture. Easy!
The finishing touch was to put the 1x3s along the sides of the table going across the planks. I found some 4 inch wood screws and drilled holes through the width of these boards, and drilled appropriate places into the side of the planks. Then, wood glue was applied to the side of the 1x3s, except for where the holes were, and the 1x3s were screwed into place. This also solved the problem of not having clamps big enough to secure them. Easy!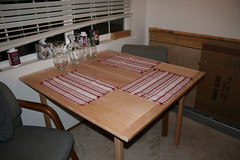
That about wraps up the structural design of the table. We're still working on sanding it down (starting with 60 grit and a mouse sander, and working down to 120 and then 240). After the sanding is done, I've got some polyurethane varnish to protect it while keeping the original wood color. I think 3-4 coats should be enough, using 00 steel wool between coats to smooth the whole thing down. Total cost? Yea, I don't want to talk about it. Wood is freaking expensive! There were a lot of sunk costs though: wood glue, saw horses, wood clamps, etc... But, that just gives me more motivation to start another wood working project. Next up: coffee table!
(special thanks to my dad and Evan Heiser for advice)
2008-03-10
Adam Pretends to be Amish
Subscribe to:
Post Comments (Atom)
No comments:
Post a Comment